This page contains information on standalone SoapUI Pro that has been replaced with ReadyAPI.
To try enhanced data-driven testing functionality, feel free to download a ReadyAPI trial.
Often you want to retrieve data from a Web Service and store it in a database for later use, for example in order to use the data as a source for other tests, or other Web Service requests.
Retrieving data from a database is done by using the SoapUI professional Database Step, but storing data in a database is not that hard either. As a matter of fact, by using Groovy, this can be done quite easily.
Let us show you how to!
Prereqs
In our example we have the following;
- A MySQL database (eviware_demo_datainsert) instance with one table, eviware_tb_datainsert
- A settings file containing login data
db_user=evidemo
db_pass=evipass
db_path=localhost
- A dummy WSDL containing just one element in the request, Author and two Elements in the response, Author and NumberOfBooks
All these can be gotten by downloading the Tutorial .zip.
Preparation
- Step 1
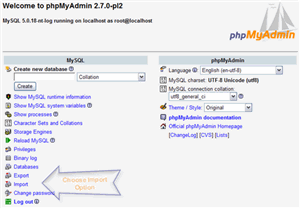 First we prepare the database. For our example we have used MySQL, but you can accomplish this in most any database. You can either create the database yourself or run the file create database.sql in a tool like PHPMyAdmin. You run it by choosing
- Step2
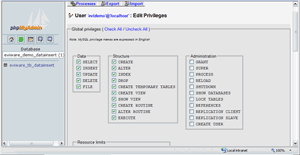 Then we of course will have to grant the user his privileges. In our example we have given the user structure privileges, but that isn't necessary really.
- Step3
Now we need to install an JDBC driver. For our example, we should install the latest stable MySQL JDBC driver here.
Admittedly, it is a pain, but follow the instructions in the doc folder. In general you have to do the following:
- Download
- Place the connector in the [JAVA_HOME]\jre\lib\ext directory
- Add the path to you CLASSPATH
- Done!
- Step4
Now we actually have everything we need.
Let's get Coding!
Now when we have the database set up and a JDBC driver running, let's get going with the Implementation.
Please note, for the sake of clarity and demonstration we have split upp the programing task in a lot of steps. It can (and should) probably be done tighter, but our example will be easier to follow!
The Implementation
Let us first examine what we want to do:
- Get an Amazon User ID from a configuration file
- Retrieve an Author from another file containing a list of authors
- Call Amazons ItemSearch with these variables
- Handle the Response
- Write the response to our database
- Loop until done
All these can be gotten by downloading the Tutorial .zip.
Step o: Start the project
First off, let us create a new project. We do this by choosing File/New WSDL Project in soapUI or by choosing CTL+N.
Then we add the WSDL; http://webservices.amazon.com/AWSECommerceService/AWSECommerceService.wsdl.
Now that we have created the project, let us create a TestSuite and in that TestSuite a TestCase. This is easiest done by right clicking the request ItemSearch and choosing Add to TestCase. We should end up with the following after naming the RequestStep:
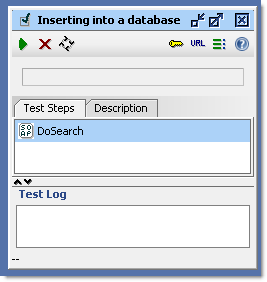
We can also trim the request to consist of only something like this:
[code]
<soapenv:Envelope xmlns:soapenv="http://schemas.xmlsoap.org/soap/envelope/"
xmlns:ns="http://webservices.amazon.com/AWSECommerceService/2007-02-22">
<soapenv:Header/>
<soapenv:Body>
<ns:ItemSearch>
<ns:SubscriptionId>[Insert YourOwn ID here]
</ns:SubscriptionId>
<ns:Request>
<ns:Author>Iain Banks</ns:Author>
<ns:SearchIndex>Books</ns:SearchIndex>
</ns:Request>
</ns:ItemSearch>
</soapenv:Body>
</soapenv:Envelope>
[/code]
Now we are ready to start the actual work.
- Step 1: Get my Id
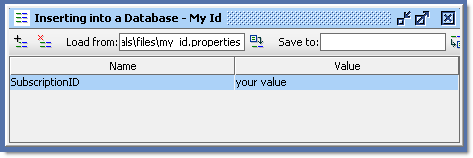
Getting an ID is simple. If you have worked with soapUI you might have come across how to do it, we create a Properties Step that refers to a file. Like this:
- Step2: Get The Author
For the purpose of this tutorial we will use a brand new step for SoapUI professional users, the Data Source Step. Now... as you will see, this is a quite handy step. It takes a File, Some XML, A Groovy Script, A Directory, or JDBC driver as a source and populates Properties with the data supplied.
In our example, the data is quite simple; it is a list with three post consisting of one author and a search area name each. The posts are separated by newlines and the fields by commas. We choose to populate the Properties Author and Index with these.
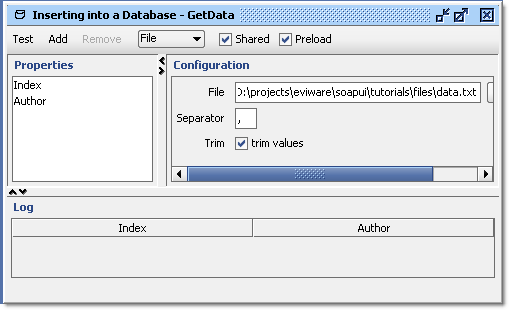
Let us also choose to Preload the data for performance reasons.
- Step3: Call the Web Service
We already have the Request, so what we need to do is move the two Properties, Author and Subscription ID to the Request and now, the benefits of SoapUI professional will really shine!
First we create a Property Transfer Step with three transfers, MoveAuthor, GetUserID and MoveIndex, like this:
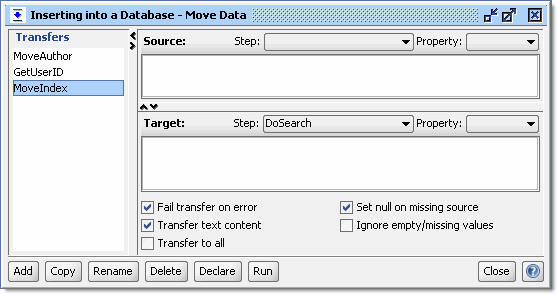
Now, to do the actual transfers we will use a new functionality in SoapUI professional. Go to the Request and choose the Outline view, like this:
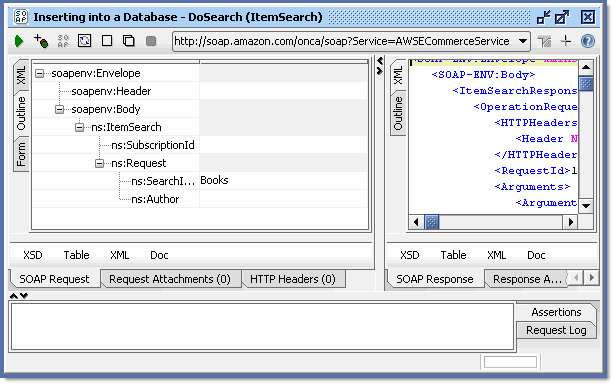
Now right click on the Element in the request you want to populate like this:
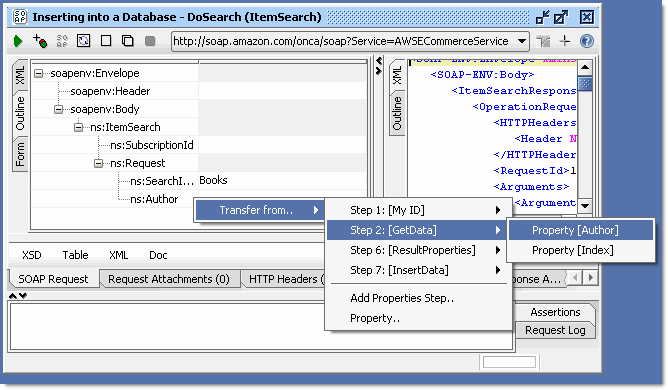
- You will then have to choose from where you want to populate the element, like this:
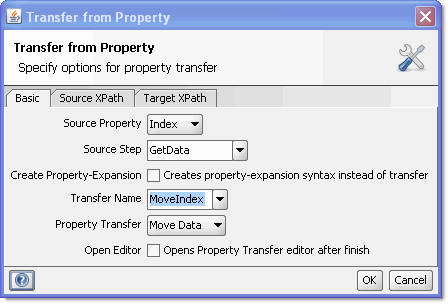
As you can see we move the Index Property from the GetData Step and move it in the Property Transfer Move Data in the transfer MoveIndex. We could also choose to forego the property transfer and instead use a Property Expansion in the Request itself.
- Step4: Handle the Response
Now when the request is made, it is time to handle the response which is done the opposite way what we just did, use the Outline to Move the content of element in the response into a property by a property transfer.
We create the property step containing one property, TotalCount:

And then the Property Transfer:
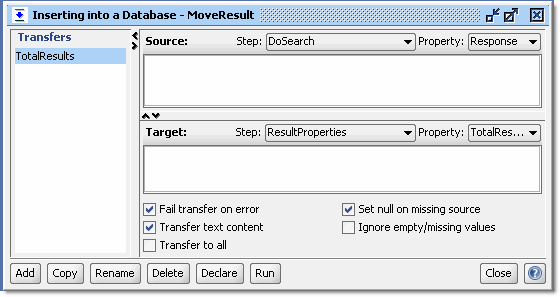
And finally we use the Outline move functionality:

- Step5: Write to a Database
- Now we just have one more thing to do, write the results to a database. This is done with a very simple Groovy script like this:
import groovy.sql.Sql
authorStep = testRunner.testCase.getTestStepByName( "GetData" )
resultStep = testRunner.testCase.getTestStepByName( "ResultProperties" )
AuthorName = authorStep.getPropertyValue( "Author" )
ResultCount = resultStep.getPropertyValue( "TotalResults" )
sql = Sql.newInstance("jdbc:mysql://localhost:3306/eviware_demo_datainsert", "evidemo", "evipass", "com.mysql.jdbc.Driver")
sql.execute("insert into eviware_tb_datainsert (Author, NumberOfBooks) values (${AuthorName}, ${ResultCount})")
As you can see it is very simple.
We start with an import of the Groovy SQL functionality (Line 1),
then populate Author and Number of Hits from the appropriate TestSteps (Line 2-5),
then connect to the database (Line 6),
and finally do the SQL Statement itself (Line 7).
- Step6: The Loop
In order to loop the Datasource Step, we need a DataSource Loop Step. This is placed at the end of the TestSteps. A DataSource Loop is very simple; we just say which Datasource Step should move into which Target Step. Like this:
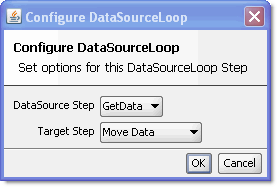
And that is it! You should now have a working test!
Next up: Get the project!
This is the companion download to the tutorial Storing paramaters from your tests in a database: Preparation.
Content
This zip file consists of the following files:
- database.sql, file for creating a MySQL Table
- data.txt, file for data in the tutorial
- my_id.properties, file for Amazon Subscription ID
- soapUI and Databases-soapui-project.xml
What you need to know
The file contains all you need to run the example in the tutorial. You should however read it carefully, remember that you need a MySQL instance running and that you need to install a JDBC driver.
Also remember that you need to change all the references to the files, since they will not work any more.
References
MySQL JDBC Download Page
The File
Database Tutorial zip file