In SoapUI, you can simulate requests that transfer attachments to the tested server. SoapUI supports various technologies:
- MTOM (Message Transmission Optimization Mechanism) – A method that W3C recommends to use for transferring binary data in SOAP messages.
- SWA (SOAP with Attachments, also known as MIME for Web Services) – A MIME-based attachment mechanism for SOAP/HTTP. SoapUI supports plain SWA as well as swaRef attachments in accordance with the WS-I Attachments Profile.
- SoapUI also supports specifying file names inline to insert binary contents from a file into a message body.
Both MTOM support and inlining require internal processing and can be disabled in the project properties for better performance (see the image below).
Attachments Tab
You specify files to be attached to a request in the Attachments tab of the Request editor:
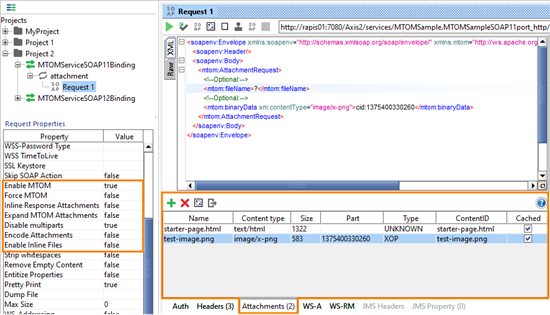
On the left, you can see request properties that you use to control attachments.
Columns
| Column |
Description |
| Name |
The file name of the attachment. For cached attachments, this column also specifies the attachment name in simulated requests:

You can specify property expansions in this column.
The file name can be absolute or relative. In the latter case, the file path is relative to the ResourceRoot property of your project.
|
| Content type |
The MIME type of the attachment. This type will be specified in the Content-Type header of the request body part:

SoapUI determines this column value automatically when you add a file to the Attachments tab. If needed, you can enter any other value later.
|
| Size |
Read-only. The attachment size in bytes. |
| Part |
The message part with which the attachment will be associated (see below). |
| Type |
Read-only. The type of attachment:
- XOP (a MTOM attachment)
- MIME (a SWA attachment)
- SWAREF (a swaRef attachment)
- CONTENT (an inline file attachment)
- UNKNOWN ( attachments, not assigned to any specific message part)
This value depends on the message part with which the attachment is associated. See below.
|
| ContentID |
The content identifier of the attachment to be used in the request:

By default, matches the attachment file name. You can change this id in this column, if needed.
|
| Cached |
Specifies if the attachment is stored in the project file. See below. |
Viewing an Attachment
To view contents of a file, double-click this file in the Attachments tab, or select the file and click  on the toolbar.
Response Attachments
The response part of the editor also has the Attachments tab. It displays all attachments that the response message includes, with their corresponding names, content types, sizes, and other attributes.
How to Add an Attachment
- Switch to the Attachment tab of the request editor, click
 and select a file from the file system.
– or –
Simply drag a file from a file manager (like Windows Explorer) to the Attachments tab.
- SoapUI will prompt if the file should be cached in the request or not.
If you select to cache the file, SoapUI will store a compressed file copy in the project and will use it in simulated requests. If you select not to cache the file, SoapUI will read the file contents from hard drive every time you simulate a request. For more information on caching see below.
- After you added a file to the Attachments tab, you need to specify a message part for the file. To do this, use the Part column:
- If the WSDL defines that the operation uses SWA attachments, the Port drop-down list will contain all defined MIME parts. Just select which part should be used for the attachment.
- If the request message contains swaRef elements with the
cid:nnnn values, or binary elements (base64 or hex) with cid:nnnn values, that nnnn value will be available in the Part drop-down list. Select them to associate the attachment with the appropriate swaRef element.
- Selecting a message part for an attachment will update the attachment’s Type attribute, which will display one of the supported values like XOP, MIME, or another. See above.
Anonymous Attachments
Sometimes you may want to attach files although this is not specified in the WSDL. For this purpose, you can select an message part. For such attachments, you may also need to enter the ContentID value.
- After you added a file to the Attachments tab, you may need to specify the attachment in the message body and to change certain project properties. The actual actions to perform depend on which mechanism your web service uses for file transferring. See below for details.
MTOM Attachments
To specify the place for the attachment contents in message payload, use the cid:nnnn syntax:

nnnn is an arbitrary identifier that you use to indicate the message part for the attachment.
To specify a MTOM attachment:
- Set the
Enable MTOM request property to true.
- Add a file to the Attachments tab as it was described above.
- In the Part column, select the
cid identifier that your request body specifies:
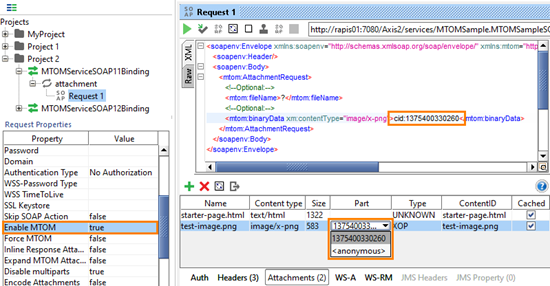
To fill the drop-down list of the Part column, SoapUI searches for cid: strings in the message body. If needed you can change the nnnn part of the cid:nnnn identifier, and SoapUI will update the drop-down list accordingly.
If we simulate this request, we will see the following:
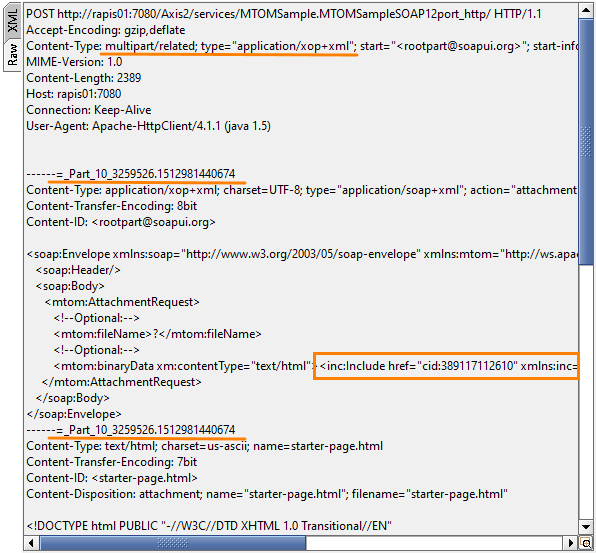
- SoapUI sends the outgoing message as a multipart message with the appropriate value of the
Content-Type header
- The first message part contains the message, the second contains the attachment
- The
binaryData element in the message contains an XOP <Include> element referring to the second part of the message
SWA and swaREF Attachments
These attachments are an older mechanism of attaching files to SOAP messages (MTOM is recognized as a standard nowadays). Nevertheless, SoapUI supports this mechanism to help you test existing web services that might use this technology.
- Add a file to the Attachments tab as it was described above
- Select the appropriate value in the Part drop-down list. The part is set by the web service definition
For example, if the WSDL definition of the service contains the following code:
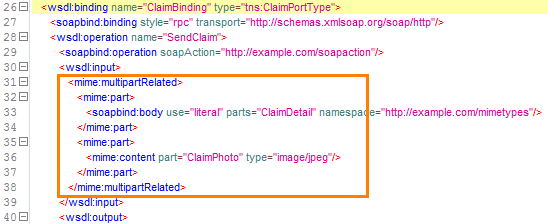
You need to select the ClaimPhoto part in the Attachments tab for the file:

For swaRef, the definition will look in the following way:

And the settings in the Attachment tab will be following:


SoapUI Open Source
- Support for SOAP and REST API Testing.
- Easy multi-environment switching.
- Detailed test history and test comparison reporting.

SoapUI Pro
- Support for SOAP, REST, and GraphQL API Testing.
- Easy multi-environment switching.
- Detailed test history and test comparison reporting.
Inline Files
One more way to include a file in a request is to “inline” it:
- Set the
Enable Inline Files property of your request to true
- (Optional) Add a file to the Attachments tab as it was described above
- Use the
file: prefix to specify the file name in the request body. If you added the file to the Attachments tab, specify the file name only. Otherwise, type the file name and path. The path can be absolute or relative. In the latter case, the path is relative to the ResourceRoot property of your project
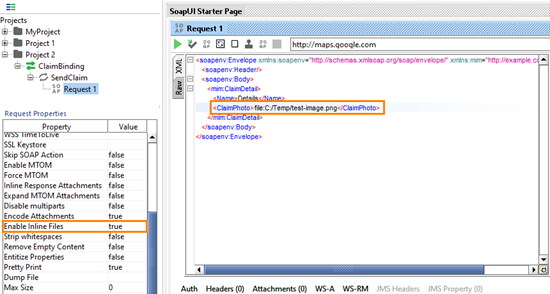
Note: inlining works for elements that store base64 or binary data.
Caching Attachments
When you are adding a file to the Attachments tab, SoapUI asks you if you want to cache the file or not:
- If you select to cache the file, SoapUI will save the compressed copy of the file into your test project, and will use this copy in simulated requests. If the file on hard drive changes, SoapUI will not “notice” this. It will continue using the cached copy.
To update the file in this cache, select it in the Attachments tab and click  on the toolbar:

Caching increases the project file size, but makes it easier to open and use the project on other computers.
- If you choose not to cache the file, SoapUI will store the fully-qualified file name in the in the project. Every time you simulate the request, SoapUI will read the file contents from the hard drive. You can select this mode, if the file is large, or if the file is updated frequently on the hard drive.
The disadvantage of that approach is that it will not be easy to port the project to another computer. A possible workaround is not to cache a file and use a property expansion in the Name column to specify the file name.